

How To Make An Element Not Appear Until Another Animation Is Done Css
Have yous ever see a beautifully animated component on a website and thought to yourself, "Wow! That'southward sleek — I wish I could do that," simply rapidly gave up on the thought because yous assumed it was either across your skill or just achievable using an animation library of some sort?
You'd be surprised to learn that most of these circuitous designs you see every day were created with patently vanilla CSS, using the ability of pseudo-elements. In this article, we'll be looking at how to utilize these pseudo-elements to create staggering effects.
Nosotros'll learn nearly pseudo-elements — specifically the ::before and ::afterward pseudo-elements — and how we tin get creative with them to create staggering blithe transitions. We'll start past creating a elementary but creative blithe push to get a feel for it, then take information technology a notch higher by creating an animated profile card that showcases these pseudo-elements' true ability.
Why use animations?
Animations create micro-interactions betwixt your users and your website. Information technology can be quite difficult to grab a user'south attention, just a well-designed and well-placed animation can pull users in by getting them interested in the content of your website.
Cool animations also give life to simple-looking interface designs and also assistance to better the user experience when they're designed around user actions by providing visual feedback.
Prerequisites
Before we can go to the fun part, we have to encompass some basics to familiarize ourselves with all that's required to brand our animations work. You should have:
- A basic understanding of HTML
- A basic agreement of CSS
- Code editor and browser
What are pseudo-elements?
Pseudo-elements are CSS selectors used to insert bogus or decorative content (i.e., content that is not found in the bodily HTML markup) and to way certain parts of an element. There are several pseudo-elements like the ::earlier, ::after, ::placeholder, ::beginning-letter, etc. But in this article we'll be focusing on just two, ::before and ::after.
The ::before pseudo-element
An chemical element'due south ::before pseudo-element inserts some content before the element.
h1::before { content: "😀"; } The output of the higher up would be:
![]()
The ::after pseudo-element
The ::after pseudo-element is used to insert some content after the content of an element.
h1::after{ content: "😀"; } Similarly, the output of the to a higher place would be:
![]()
What is the departure between pseudo-elements and pseudo-classes?
Pseudo-elements are sometimes confused for pseudo-classes considering they look and sound similar, only they are actually not.
In dissimilarity with pseudo-elements, which are used to insert content, pseudo-classes are but selectors that target an element's country, too as a few other things. A typical example is the :hover country pseudo-class selector of an chemical element, which indicates that you desire to apply sure CSS rules when the user hovers over it.
It is also worth noting that a pseudo-element is declared with two colons, i.e., :: while a pseudo-class is declared with a unmarried colon, i.eastward., :.
Animating with pseudo-elements
Before we can get right down to the project section of the article, we take to get on the same page first. Let's brand sure we have a basic understanding of some of the CSS properties that brand animating with CSS a possibility:
-
transform-
translate -
rotate -
scale -
skew
-
-
transition -
positioning -
z-index
Information technology is my assumption that you are probably familiar with most of these, if not all of them, but just in example, we'll have a brief look at them. If you're already familiar with them, feel gratuitous to skip ahead to the tutorial.
A look at CSS Transform and Transition
We'll be using the CSS transform and transition properties in our projection, and so it is important that you accept a basic agreement of what they are and how they work.
The CSS transform property basically allows you to translate (move), rotate, calibration, and skew an element.
.box-1 { transform: translate(100px, 100px); } .box-2 { transform: rotate(60deg); } .box-3 { transform: scale(2); } .box-4 { transform: skew(-30deg); } 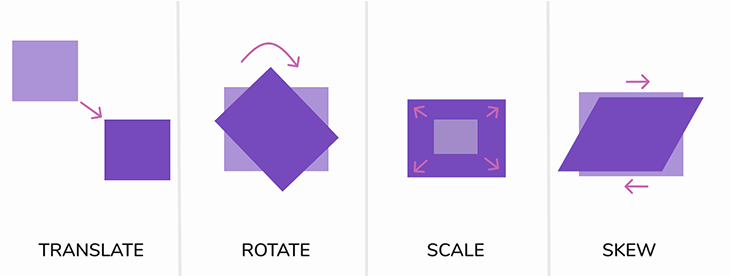
The transition holding allows you to set a time duration for these changes, from one country to another to occur, smoothing the entire animation process.
Positioning with relative and absolute properties
In that location are several CSS properties that aid you hands control the flow and position of an element in an HTML document, but for the sake of this article, we'll only be looking at the relative and accented position properties.
Relative position
Setting an element'south position to relative lets y'all control the position of the element in relation to its normal document period. For instance, yous tin move it effectually and utilize the location where information technology would take been by default every bit a point of reference.
Hither'due south an example:
.box-2 { position: relative; right: 150px; meridian: 0; } 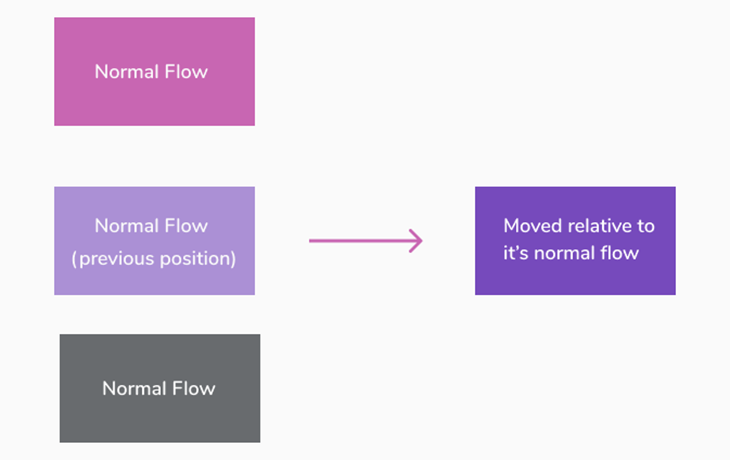
Every bit you can see, the second box gets moved to the right by 150px from its original position, which too doesn't bear upon the natural flow of the certificate every bit the previous space information technology occupied is respected by the surrounding elements.
Absolute position
When setting an element's position to absolute, on the other hand, CSS pulls the element from its natural flow (making it overlap other elements) and uses the provided coordinate to effort to place this chemical element in a parent container, whose position has been ready to relative.
When information technology fails to discover any parent, it uses the body of the certificate as a relative point of reference.
Example:
.parent-container { position: relative; } .box-ane { position: absolute; left: 20px; superlative: 20px; } .box-2 { position: absolute; correct: 50px; bottom: 40px; } 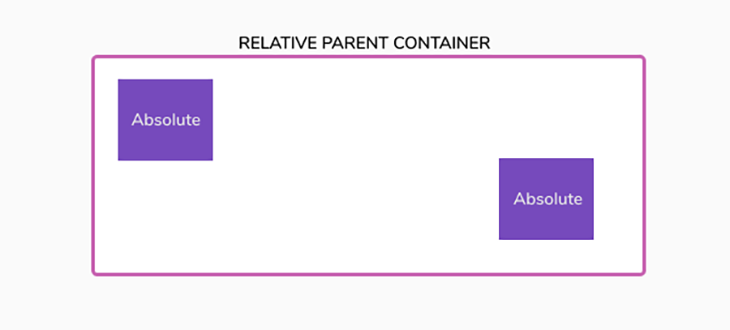
As you'd expect, the parent container becomes a relative signal of reference for positioning its absolute children using the provided coordinates.
Controlling the stacking order of elements using z-alphabetize
The z-alphabetize property lets us stack elements on top of each other inside the stacking context of the page. If an element has a higher stack society, it will always announced before an chemical element with a lower stack society.
Case:
.box-one { z-alphabetize: one; } .box-two { z-alphabetize: 2; } .box-three { z-alphabetize: 3; } .box-4 { z-index: 4; } 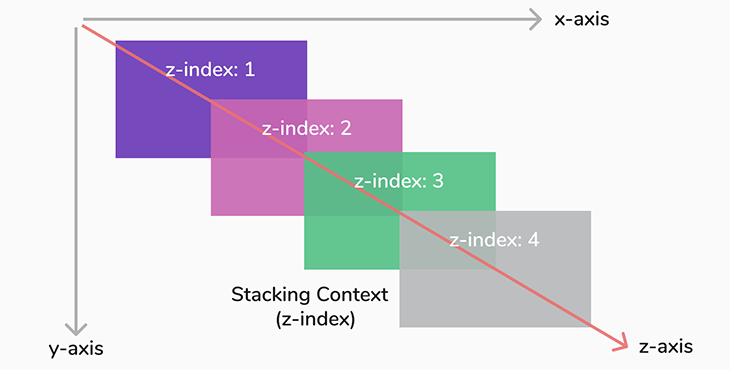
It is also worth noting that the z-index merely works on elements that have been positioned using the position property. If 2 elements take the same z-index, the one that appears last in the HTML markup stays on summit.
Now that nosotros've covered our basics, allow'south motion on to our starter projection.
Creating an animated push button using pseudo-element
For our showtime project, we'll start past creating a unproblematic animated button to get a experience for using pseudo-elements to animate. Then, we'll move on to the more complicated project.
We'll start by creating an anchor tag in our HTML mockup that nosotros'll later style to a button.
<a href="#" class="btn">Hover Me</a>
Here'southward our output:

Let'due south jump to our CSS file and mode this link to look like a typical button.
.btn { text-decoration: none; edge: 2px solid #764abc; color: #764abc; padding: 10px 20px; border-radius: 25px; transition: all 1s; position: relative; } The lawmaking should be cocky-explanatory — we've removed the default underline ornamentation, added a solid border of 2px, and made the color of the push the same as the text. We also added padding to put some space betwixt the text and the border and added a border radius to bend the edges of the button.
Lastly, we added a transition elapsing of 1 2nd — i.e., whatever modify that occurs to this button should occur smoothly and animate within a second — and prepare the position to relative considering we intend to put a pseudo-chemical element within this push.
Recall that to position a child element with absolute position, the parent container has to be gear up to relative? This push will be the parent container. Beneath is our output:
Now, we are going to create a pseudo-element of this button.
.btn::before { content: ""; position: absolute; elevation: 0; left: 0; width: 100%; height: 100%; background-color: #764abc; transition: all 1s; } We've created a pseudo-chemical element with an empty content belongings, which ensures nothing is placed inside of it. We set its position to accented, which removes it from its normal flow (making it overlap the push), and then gear up the coordinates for height and left to 0, which pins the empty pseudo-chemical element to the button at those exact locations.
Afterwards, we set the width and top to be exactly 100 percentage of the parent, making information technology the same size as the button itself.
Lastly, nosotros fabricated the pseudo-element's background the aforementioned color every bit the button and added a transition of 1 second once more. Below is the output:

As you lot can see, the pseudo-chemical element is overlapping the button because we've used an absolute position.
To resolve this, nosotros have to use the z-index property to modify their stacking context by pulling the pseudo-element behind the push button using a negative value. And then, nosotros will utilise the translate holding to move this pseudo-element to the left by -100%.
.btn::earlier { /*...previous lawmaking */ z-index: -i; transform: translateX(-100%); } Et voilà:

At present nosotros will animate this pseudo-element and then that it returns to its original position when nosotros hover over the push button, using the :hover pseudo-class.
.btn:hover::earlier { transform: translateX(0); } In the above, we are basically saying that when someone hovers over this push, this pseudo-element should motion back to its initial absolute position. Here'south our output:

However, the text is still hidden because the text and the pseudo-chemical element are both the same color. Allow's change the color of the text to display in white when the button is hovered over.
.btn:hover { color: #fff; } 
Because we added a interpret holding to the push button itself, this change volition occur smoothly.
For the last step, we will utilise an overflow: subconscious property to the push to hide whatsoever chemical element that overflows from the container. When applied to the button, it will hide the translated pseudo-element and only bear witness it when it moves back to position.
.btn { /*...previous code. */ overflow: subconscious; } Terminal output:

There you have it! Nosotros've successfully created a beautifully animated button using pseudo-elements. You can find the complete source code at the end of this commodity.
Creating an advanced animated contour carte du jour using multiple pseudo-elements
Now for the main event, nosotros'll create a more complex animated profile card using multiple pseudo-elements — four, to be exact — to create a truly stunning hover effect.
Without farther ado, let's get right into the HTML markup.
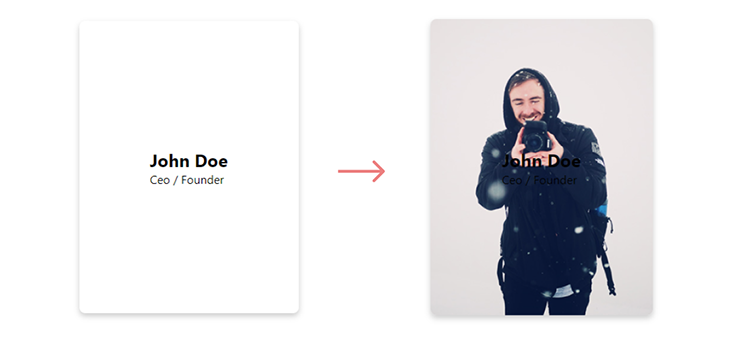
<div course="profile-card"> <div class="info"> <h2>John Doe</h2> <p>Ceo / Founder</p> </div> </div>
Nosotros've created a uncomplicated card div that holds the user's bio (consisting of name and position):

Permit's jump to the CSS file and style this menu.
.profile-card { width: 300px; height: 400px; border-radius: 8px; box-shadow: 0 4px 8px rgba(0, 0, 0, 0.2); display: grid; place-items: centre; position: relative; background: url("/epitome.jpg") no-repeat center center/comprehend; } We've created a fixed width/pinnacle card, placed the content within at the middle using CSS Grid, and added a box shadow to give the edges a bit of shadow and so it looks more than realistic. Lastly, we set the card equally relative to make information technology a parent container for the pseudo-elements and added a centered background prototype. Let'southward see our output:
With that out of the way, allow'due south go on with creating the pseudo-elements.
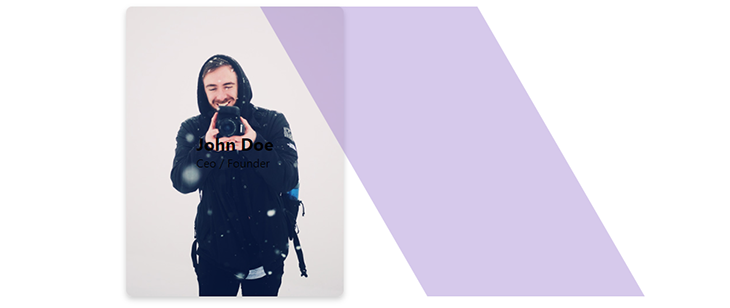
This is the tricky part. We intend to use four pseudo-elements, just an element can only take one ::before and one ::after pseudo-element, respectively. To get around this, nosotros'll be using the card itself to create two pseudo-elements, and then apply the info div inside the bill of fare to create another two.
Permit's begin with the info div.
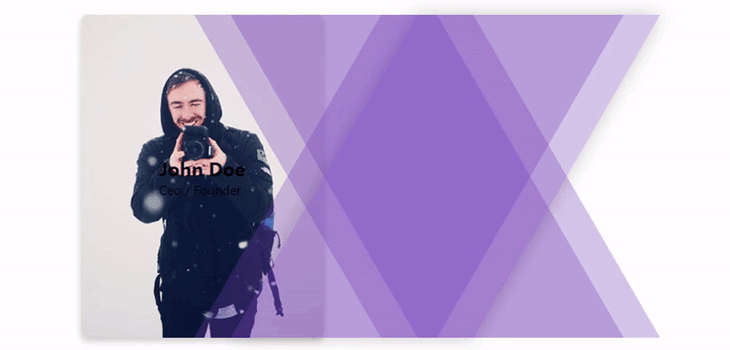
.info::before { content: ""; position: absolute; meridian: 0; left: 0; width: 100%; pinnacle: 100%; background: #764abc; transform: skew(30deg) translateX(100%); opacity: 0.3; z-index: -1; transition: all 0.6s ease; } Now, because the info div itself has no stock-still width or height, the pseudo-chemical element takes the full width and summit of the parent carte, making information technology the same size as the carte du jour.
We then skew it past 30deg, which slants and and then translates it by 100 pct. This moves it to the right. The negative index ensures it stays backside the text, while the opacity makes it semi-transparent.
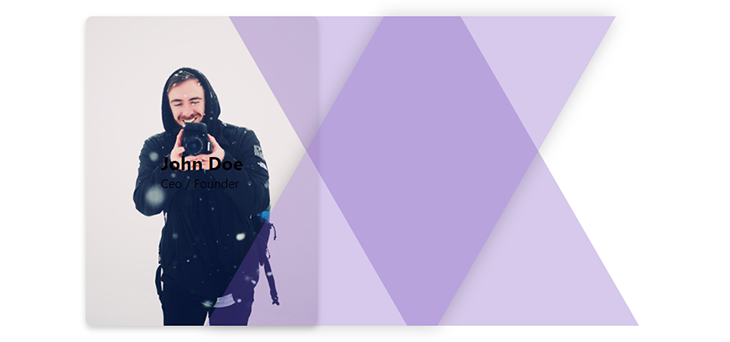
Moving on to the 2nd pseudo-element:
.info::later { content: ""; position: absolute; superlative: 0; left: 0; width: 100%; top: 100%; groundwork: #764abc; transform: skew(-30deg) translate(90%); box-shadow: 0 0 20px rgba(0, 0, 0, 0.vii); opacity: 0.three; z-alphabetize: -1; transition: all 0.6s ease; } We've done basically the same affair as the ::earlier pseudo-element, merely so switched the skew management to the opposite direction, and added a box shadow then shadows are added to the sides, making it more 3D-similar.
Now, we'll get in so that whenever this card is hovered over, the pseudo-elements movement further into the menu. You can rest assured this volition happen smoothly because we added a transition to the pseudo-elements.
.contour-card:hover .info::earlier { transform: skew(30deg) translateX(50%); } .contour-card:hover .info::after { transform: skew(-30deg) translateX(40%); opacity: 0.7; } Output:
Now allow's create 2 more pseudo-elements using the card itself.
.profile-card::before { content: ""; position: absolute; superlative: 0; left: 0; width: 100%; height: 100%; background: #764abc; opacity: 0.3; transform: skew(30deg) translate(100%); transition: all 0.6s ease; z-index: -ane; } This code should be self-explanatory by this point; we've simply done the same matter equally higher up, only this time we've only translated the card's own ::before pseudo-element to the right by 85 percent. Take a wait:

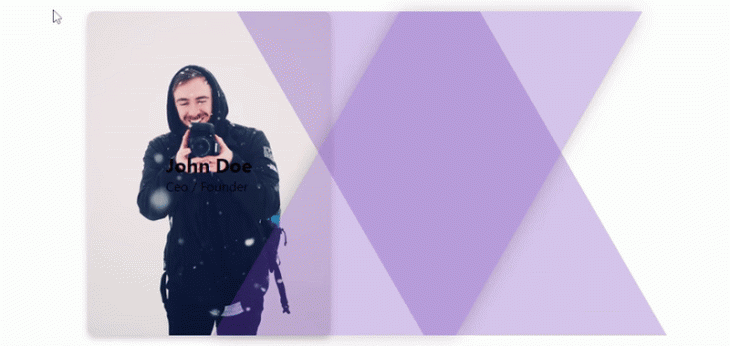
Next, nosotros'll create the last pseudo-element and skew it in the opposite direction from the ::before.
.contour-bill of fare::after { content: ""; position: accented; height: 0; left: 0; width: 100%; tiptop: 100%; background: #764abc; opacity: 0.3; transform: skew(-30deg) translate(85%); transition: all 0.6s ease; z-index: -1; } 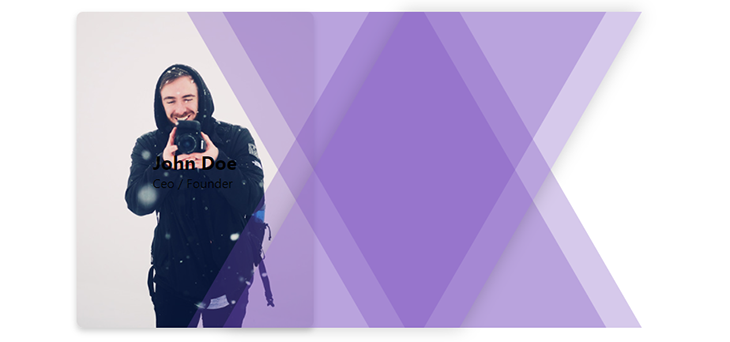
Equally y'all would have guessed, we'll likewise make it then when this profile bill of fare is hovered, these newly created pseudo-elements move in, like the previous two. But this time around, we'll move them even further than the previous ii.
.profile-card:hover:before { transform: skew(30deg) translateX(30%); } .contour-card:hover:later on { transform: skew(-30deg) translateX(xx%); } Output:
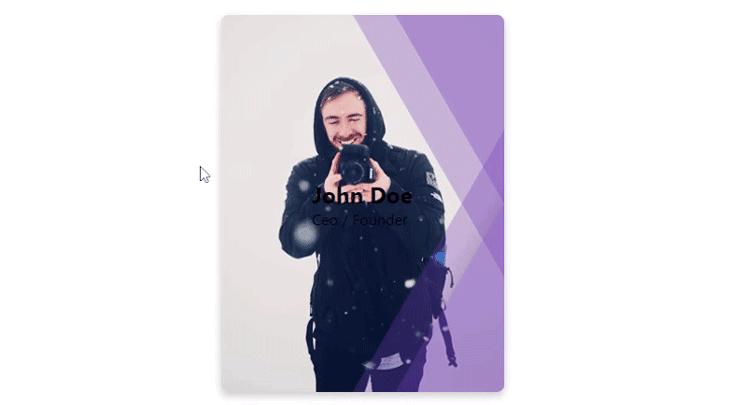
As you can see, our profile menu is coming together. Now for the last piece of the puzzle, we will set the overflow property of this card to hidden so equally to hide the flood parts.
.profile-card { /*...previous code. */ overflow: hidden; } Output:
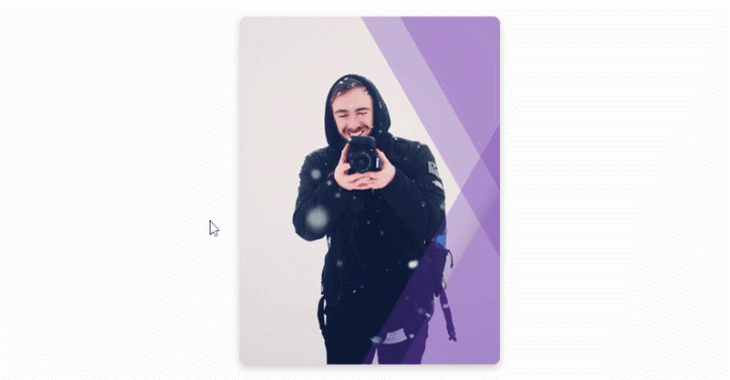
Lastly, nosotros will alter the text color to white and arrive so the opacity is fully transparent — but, when the card is hovered over, we'll change the opacity back to normal, making them visible.
.info h2, .info p { colour: #fff; opacity: 0; transition: all 0.6s; } .profile-card:hover .info h2, .profile-card:hover .info p { opacity: 1; } Final outcome:
Source code (CodePen)
- Blithe button
- Contour Card
Conclusion
Congrats on making information technology to the end. As you lot have seen, the ::earlier and ::after pseudo-elements can be used in several unlike ways to produce interesting animated effects that requite life to our designs.
You lot tin explore these further to create even more complex designs and animations, equally there's and then much more that tin can be done using the ::earlier and ::after CSS pseudo-elements, and we have only just scratched the surface.
Is your frontend hogging your users' CPU?
Every bit spider web frontends get increasingly circuitous, resource-greedy features demand more than and more from the browser. If you're interested in monitoring and tracking client-side CPU usage, memory usage, and more than for all of your users in production, try LogRocket. https://logrocket.com/signup/
LogRocket is similar a DVR for web and mobile apps, recording everything that happens in your web app or site. Instead of guessing why bug happen, you can aggregate and written report on key frontend performance metrics, replay user sessions along with application country, log network requests, and automatically surface all errors.
Modernize how you lot debug web and mobile apps — Starting time monitoring for gratis.
Source: https://blog.logrocket.com/how-to-use-css-before-after-create-custom-animations-transitions/
Posted by: rommelcouldic.blogspot.com
0 Response to "How To Make An Element Not Appear Until Another Animation Is Done Css"
Post a Comment